Anúncios
Start simple to build skill: reduce complex scenes into a few clear forms and you gain speed and accuracy. This guide shows a repeatable workflow: begin with simple outlines, block in structure, then refine with details and shading.
The visual shorthand of circles, boxes, and cylinders helps the brain sort what it sees into neat, drawable parts. That makes portraits, products, rooms, and figures easier to tackle whether you work from life or imagination.
Short, steady practice—a few focused drills each day—builds steady hand-eye coordination and confidence. Expect clear gains from consistent, small routines rather than chasing detail too soon.
What follows: the difference between flat outlines and three-dimensional forms, core geometric types, blocking-in techniques, simple perspective tips, and clean finishing moves that lift your drawings.
Why Basic Shapes and Forms Are the Foundation of Drawing
When you simplify a subject into a handful of readable elements, the whole scene becomes manageable. This method gives you a clear roadmap to place parts, check proportions, and avoid wasted time later.
Anúncios
Simplification as a practical strategy
Simplification means reducing complex objects to a few readable blocks before adding detail. Start with these blocks, verify placement, then refine. That order keeps the process fast and predictable.
Shape versus form: flat vs. volume
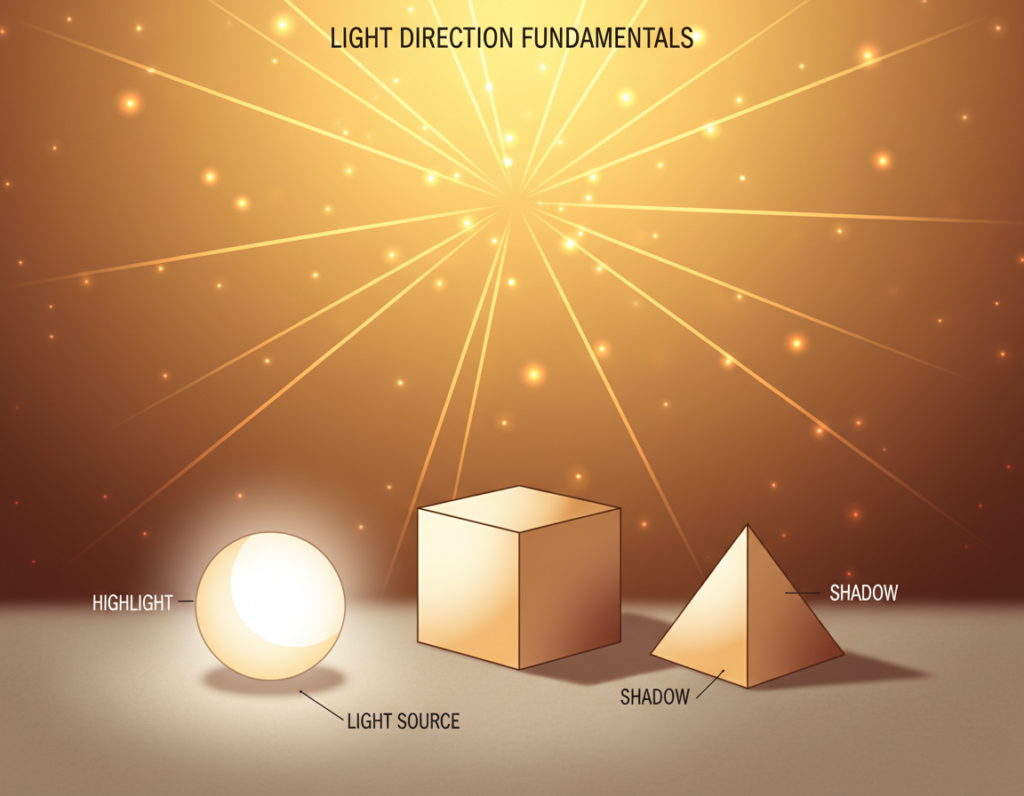
A 2D shape (circle, square, or triangle) maps location and silhouette. A 3D form (sphere, cube, cylinder) adds depth and direction. Use both: shapes for layout, forms to show rotation and mass.
Saving time by preventing proportion errors
Blocking in major volumes stops the common issue of working for hours and finding the proportions are wrong. If an object’s overall size is off, details won’t fix it. A structure-first approach reduces rework and saves time.
Anúncios
- Identify the big shapes.
- Check alignment and symmetry.
- Turn key areas into simple forms for depth.
For a quick guide to these steps, see this practical primer on using simple forms to map any subject: map major volumes before details. Use the checklist each time you want to draw anything to keep work efficient and accurate.
Meet the Core Building Blocks: From Geometric Shapes to 3D Forms
Identify the handful of forms that carry weight and direction in a sketch. Start by naming the flat elements that map a subject, then think about the volumes those elements can become. This helps you judge proportion and tilt before you refine.
Essential 2D shapes
Work with the familiar geometric shapes: circle, square, rectangle, and triangle. Variations—stretched rectangles, rounded rectangles, and tapered triangles—let you match more real silhouettes. Use these to place parts and check relationships quickly.
Essential 3D forms
Turn 2D outlines into forms: sphere, cube/cuboid, cylinder, cone, and pyramid. Each has a role as a construction base. Use a cube for boxy mass, a cylinder for tubes and limbs, a sphere for joints and heads, and a cone for tapered parts.
When to use 2D blocking vs. 3D construction
Block in with flat elements when you need fast placement and proportion. Switch to volumetric forms when you must show depth, rotation, or lighting. Many objects combine both: a camera can be a cuboid with cylinders for lenses and small boxes for buttons.
Tip: The same circle can become a sphere or the end of a cylinder; a square can become a cube. These are guides, not rules—mix and match to suit the subject and level of realism.
Drawing Basic Shapes as a Step-by-Step Workflow
Begin with loose, whisper-light lines to place the subject’s footprint and gauge the overall area. This first pass is about location and proportion, not perfection. Keep marks faint so they blend with later shading and won’t press into the paper.
“Start soft—structure first, finish later.”
Three repeatable steps guide most successful sketches:
- Block in — map major planes and area with light strokes to set scale and alignment.
- Build volume — turn those blocks into 3D forms, add planes or wrap ellipses to show depth.
- Refine — delay edges, contours, and texture until the structure reads correctly; then add details and shading.
Keeping early construction lines soft prevents engraving the paper. That tip makes later shading cleaner and speeds the whole process. Repeat this step-by-step workflow across references to build faster understanding than over-rendering a single sketch.
For a guided lesson on converting blocks into forms, try this short course on working with shapes.
Blocking In Objects with Simple Shapes for Accurate Proportions
Start by scanning the scene and reducing each item to a few clear forms that set size and rhythm. Work lightly and fast so you can fix proportion without wasting time. This approach builds a predictable way to map any subject and improves spotting errors early.
Deconstruct everyday items into clear parts
Scan objects for dominant masses: use rectangles for big blocks, circles for round parts, and a triangle for tapers. A lamp, for example, can be stacked rectangles to capture height and width before you add a cord or shade detail.
That simple example saves hours of correcting small mistakes later.
Use a centerline and quick measuring
Draw a faint vertical line through the center to compare left and right. Measure by eye: compare one unit widths and align key landmarks. Use the same pair of light lines to check tilt and balance.
Spot and fix “bad shapes” with quick repeats
Bad blocks look pinched, skewed, or uneven. If a rectangle feels wrong, erase lightly and re-block. Check negative space and correct before adding detail.
Restart early — it saves more than it costs
“DO NOT BE AFRAID TO RESTART!!”
Restarting when a first pass misses proportion is normal. Practice from life — a mug or shoe in the real world trains your eye faster than photos. Keep practicing short studies and you will save time as your layouts improve.

Using 3D Forms to Add Dimension, Direction, and Realism
Treat each part as a small, turnable form to lock in direction and weight. Moving from flat blocks to three-dimensional forms lets a sketch read as solid and directional.
Why upgrade to forms? A cube or cuboid shows tilt and plane changes. A cylinder reveals turn and axis. A sphere captures rotation at joints. These facts stop objects from appearing flat and give the eye clear cues about volume.
Building a skeleton with cubes and cuboids
Start with a master cube aligned to the object’s facing. Use stacked cuboids to set the overall footprint and perspective.
For boxy items, match orientation first, then add bevels, recesses, and seams.
Adding cylinders for tubes and rounds
Cylinders appear where parts extend or rotate: lenses, handles, limbs, pipes, and bottles.
Place an axis line through each cylinder so the volume reads correctly in perspective.
Using spheres for orientation and joints
Spheres are excellent for heads and key masses. Draw contour lines on a sphere to show which way it turns.
These contour lines help place eyes, mouth, or limb rotation with confidence.
Combining forms for figures and products
Construct a camera by blocking a main cuboid body, stacking smaller cuboids for the top, and attaching a cylinder lens at the front.
For figures, start with spheres for the head and torso, cylinders for arms and legs, and cubes for hands and feet. Adjust proportions, then refine anatomy.
“Build the skeleton first; detail follows a correct structure.”
| Form | Typical use | Quick tip |
|---|---|---|
| Cube / Cuboid | Boxy products, chests, furniture | Set orientation before adding edge detail |
| Cylinder | Lenses, limbs, handles, pipes | Draw center axis to keep ellipses consistent |
| Sphere | Heads, joints, rounded masses | Add contour lines to show direction |
Perspective Basics That Make Your Shapes Look Solid
A clear horizon gives you control over which planes—top, side, or bottom—are visible.
Finding the horizon line (eye level)
The horizon equals eye level and sets your viewpoint. Move a small box or phone to eye level, then higher or lower. Notice how the top plane appears or disappears as it crosses that line.
Why circles become ellipses
Tilting a cup makes the rim compress into an ellipse. For a believable cylinder, sketch two ellipses plus side lines. Keep ellipse tilt consistent to keep the tube readable.
Duplicating and dividing a cube
Duplicate a cube to extend forms. Divide faces with diagonals to find centers and contour lines. Use that grid to add features or build a pyramid from the cube as a reliable base.
Master cube mindset
If you can place a cube, you can block in products, characters, and many objects. Treat the cube as a root form and rotate it mentally to plan planes and light.
| Concept | Demo | Quick tip |
|---|---|---|
| Horizon (eye level) | Place box at, above, below eye line | Sketch faint centerline to compare planes |
| Circle → Ellipse | Tilt a cup to observe rim | Match ellipse tilt on both ends of a cylinder |
| Duplicate / Divide Cube | Copy cube, draw diagonals to locate centers | Use center to add details symmetrically |
| Master Cube | Start complex forms from one cube | Rotate cube mentally before adding parts |
Clean Construction: Contour Lines, Line Weight, and Simple Shading
Clean line work and thoughtful marks turn rough construction into a readable, three-dimensional form. Use a small set of consistent marks to communicate turn, overlap, and surface without overworking the page.
Contour lines for turning surfaces
Use contour lines on spheres, cylinders, and boxes to show direction and rotation. For a quick sphere: draw a circle, add a horizontal ellipse and a vertical ellipse to indicate orientation.
Invisible lines and construction marks
Invisible lines—center axes, wrap lines, and hidden edges—speed the process and improve accuracy. Keep these marks light so they act as guides for later passes.
Line weight for clarity
Make overlaps and silhouettes bold and keep internal guides faint. Varying line weight helps parts read at a glance and makes forms look like they occupy space.
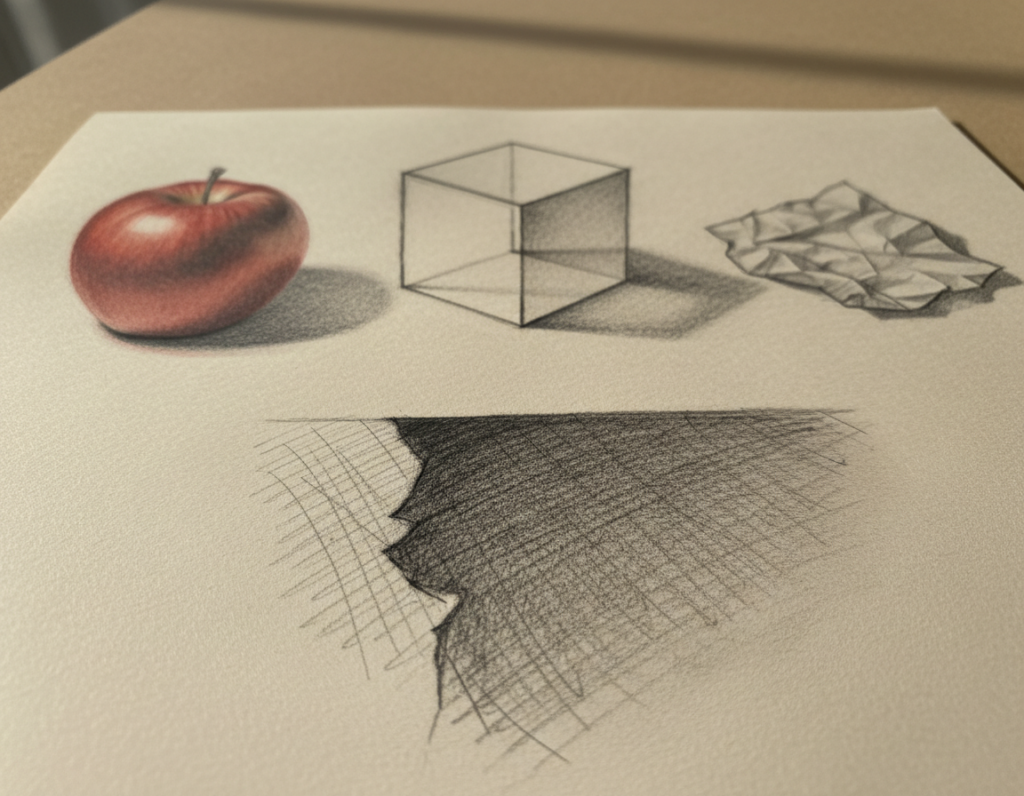
Shading basics tied to structure
Pick a light direction, shade planes and curvatures accordingly, and add cast shadows that match perspective. Follow this sequence: structure first, a bold line pass, then shading and adding details.
- Block volumes with light lines.
- Clean overlaps with heavier edges.
- Shade planes to sell the form.
| Tool | Use | Quick tip |
|---|---|---|
| Pencil | Guides, invisible lines | Keep pressure light |
| Pen | Final line weight | One confident pass |
| Tortillon | Soft shading | Blend along form |
Conclusion
A reliable workflow starts with large volumes and ends with a bold, clean final pass. Simplify any object into clear forms, then refine with confident lines and measured shading. This order saves time and builds steady progress.
Practice in short sessions. Try 15–20 minutes: cube + cylinder, then sphere + cone. Pick one form and draw it from three angles with a clean bold pass to sharpen observation from life.
Use everyday objects as examples—mugs, lamps, cameras—to grow your understanding. If a sketch looks off, restart early and re-block the big shapes instead of patching details.
Next steps: do a quick daily block-in exercise and one longer weekly skeleton study. With repetition and focused practice, improvement is a reliable way forward.