Anúncios
Mastering character turnaround drawing basics is the clearest way to keep your design consistent across every view. A solid sheet locks in head, body, and main shapes so poses match from front to back.
In his December 19, 2019 guide, Adem Kaan shows why a turnaround sheet matters for animation. He explains how a simple layout saves time and keeps proportions constant as you move from one angle to the next.
This introduction previews practical steps and tips you can use right away. Expect advice on mapping poses, aligning the top and front views, and using video to study motion so your characters retain personality on paper.
Essential Tools for Character Turnaround Drawing Basics
Start by picking tools that let you sketch fast and refine cleanly. A quick freehand pass helps lock the pose and mood before you add structure.
“I recommend starting initial poses freehand to find rhythm and personality.”
Anúncios
Physical or digital? Use paper or a tablet to experiment. Many pros sketch on paper, then move to a tablet for cleanup.
Software that speeds work:
- Photoshop — strong layer control for animation prep.
- Clip Studio, Illustrator, Corel — vector and pen tools for clean lines.
- FireAlpaca — light, fast option for quick edits.
Follow each step in this guide to keep layers organized. A clear sheet makes it easy to track progress and align every view. These expert tips help your character design stay cohesive, whether the project is a simple sketch or a full animation.
Anúncios
Preparing Your Character Design for Rotation
Begin by setting a rotation that reflects who your design is. The chosen pose becomes the anchor for every view and keeps proportions honest.
Choosing the Right Pose
Think about personality. If your creature is shy, a hunched stance reads that trait instantly.
Carlianne uses her Yeti from Even Yetis Get Colds as an example; the same pose guides front, profile, and back sketches so the Yeti feels like one being in all views.
Simplifying Complex Shapes
Break the body into simple geometry: cone for the torso, cylinders for limbs, and spheres for joints. This makes each step repeatable across angles.
Tip: Align the head, feet, and main landmarks on a sheet so lines match from front view to back view. A quick sketch on paper helps you test the line work before finalizing the sheet.
“Keep shapes simple so your characters stay recognizable and consistent.”
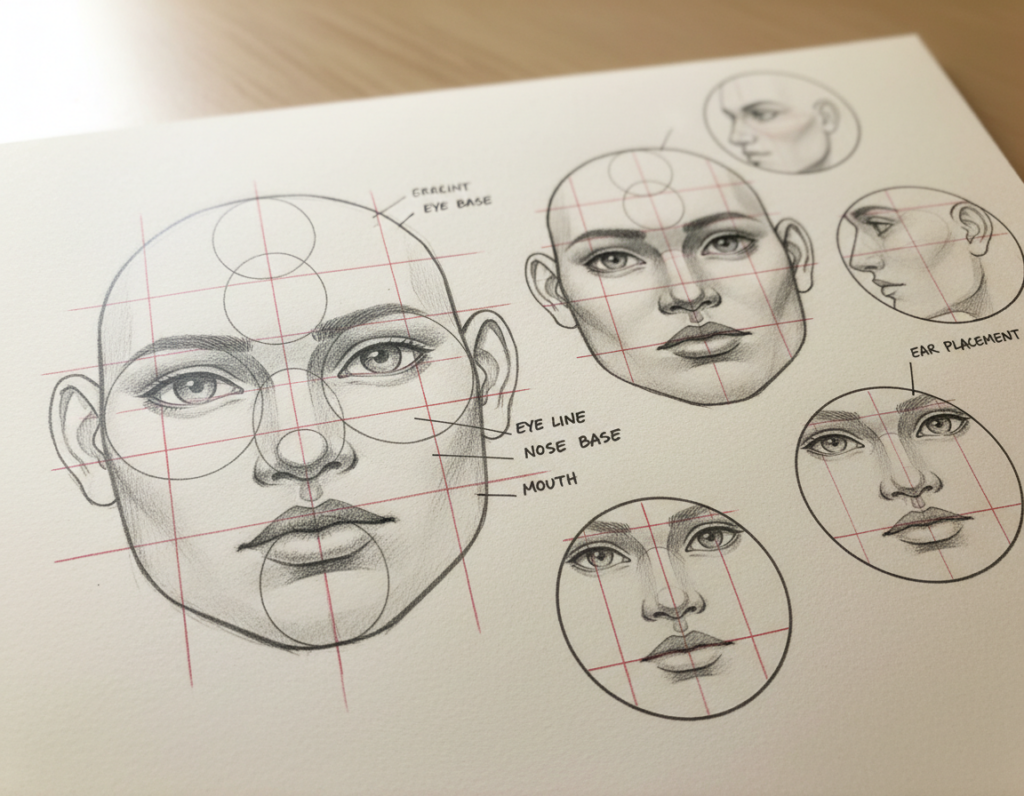
Mapping Proportions with Horizontal Guidelines
A quick grid of horizontal lines makes it simple to keep every pose on model. Establishing these guides is the first step to lock height and balance across your sheet.
Draw lines at the top of the head, the eyes, the torso, and where the feet land. Keep them light so you can tweak positions as you refine each sketch.
Why this matters: consistent lines stop the body from stretching or shrinking between views. That stability keeps the design readable and prevents surprises during animation.
Use a digital sheet to nudge guides without erasing. Layers let you overlay front, side, and back sketches so every pose aligns with the original character design.
Pro tip: mark three to five horizontal levels and reuse them on every view. Professionals rely on this step to speed review and ensure the final model reads the same in motion.
“Establishing clear guidelines early saves hours in cleanup and keeps the model consistent.”
Refining Volume and Silhouette Consistency
Visualizing your model as a solid object helps keep its silhouette true from every angle. This step forces you to treat the head, body, and limbs as volumes that wrap around a core. The result is a sheet that reads the same in a front view and a back view.
Thinking in Three Dimensions
Start by blocking simple shapes. Use spheres for joints and cylinders for limbs. This makes it easier to check how a pose holds up in profile or front.
Every step of refining the outline preserves the personality of your characters. Test each view against earlier sketches to avoid a flat result.
- Rotate core landmarks — eyes, shoulder, hip — to track volume across angles.
- Compare head and torso proportions on the sheet to keep mass steady.
- Use quick 3D sketches to verify the front and back match.
Consistent volume saves time during animation and stops the model from changing size or weight as it turns. A well-refined character turnaround shows you considered every angle and is ready for production.
Utilizing Digital Tools for Symmetry and Alignment
Modern art apps give you fast ways to check symmetry and alignment across views. A clean digital file helps you keep the head and body consistent while you refine form.
Flipping and Overlaying Layers
Flip your canvas to reveal asymmetry. Overlay front and side sketches on separate layers to compare landmarks quickly.
Using Smart Objects for Quality
Convert key elements into Smart Objects in Photoshop to preserve resolution. This keeps the design sharp for high-end animation and saves time when scaling or editing.
Tracing for Accuracy
Trace your own work to lock proportions from one view to the next.
- Stack layers like traditional cel work to check alignment.
- Use low-opacity overlays to trace and refine without losing original strokes.
- Digital methods are faster than paper for quick edits and testing.
“Alignment is key to a successful model; these tools give the precision pros rely on.”
Creating an Animated Turnaround Loop
Turn a static sheet into a short animation to show how the model reads in motion. This final step gives a clear example of form and personality across every view.
Work on a square canvas set to 5×5 inches at 300dpi. That size keeps your animation crisp and ready for professional use.
Include the standard five views: Front, 3/4 front, Profile, 3/4 back, and Back. Arrange them in order and create frames that blend each pose into the next for a smooth loop.
Convert key poses into Smart Objects to preserve line quality while you tweak timing. This step saves time when you adjust spacing or swap a view.
- Use consistent spacing so proportions hold across views.
- Keep the loop short—three to six seconds is ideal.
- Export a video file to share with clients or collaborators.
Final benefit: a polished animation turns your sheet into a functional design tool that proves the model works from every angle.
Final Thoughts on Maintaining Structural Integrity
Close your process with a quick check to ensure mass and alignment read the same in every view.
Maintaining structural integrity should be the main goal of any sheet. It keeps your characters consistent and makes animation easier.
This guide gives practical steps to refine your character design and build a reliable model. Follow the grid, volume checks, and digital alignment methods to keep proportions steady.
Practice these methods often. Each completed character turnaround will sharpen your eye and speed your workflow. With steady effort, creating a clean, production-ready sheet becomes second nature.
Keep testing, stay consistent, and let structure guide your creative choices.